Application Example
This section shows you a simple application with hardware in the loop using the dAIEdge-VLab Python API.
dAIEdge-VLab API Demo Video
What does this application do ?
In this application example, we will train a model with Tensorflow, prepare a validation dataset and execute the trained model on a remote device. Finally, we will analyze the results given by the remote device.
The following diagram shows the pipeline of this application :
  sequenceDiagram
    participant User
    participant dAIEdge-VLab
    participant Target
    User->>User: Prepare Dataset
    User->>User: Train mdel
    User->>dAIEdge-VLab: Model, Dataset, Target, Runtime
    dAIEdge-VLab->>Target: Model, Dataset
    Target->>Target: Perfom the inferences
    Target->>dAIEdge-VLab: report, logs, raw outpout
    dAIEdge-VLab->>User: report, logs, raw outpout
    User->>User: Format raw output
    User->>User: Compute accuracy metrics
Main actions :
- Training of the model on the user end
- Prepareing of the dataset on the user end
- Running the model on the remote device
- Analyzing the resutls
What problem will be solved ?
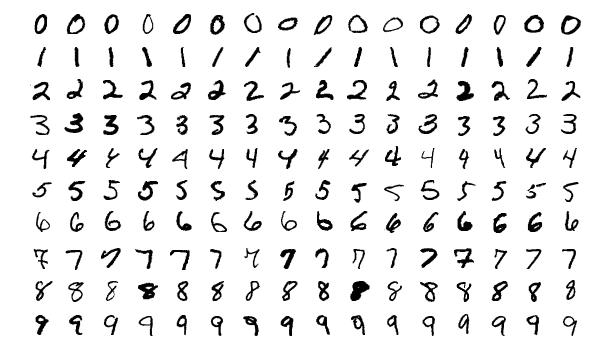
In this simple application, we will train a model to recogize numbers from an image. We will use the MNIST dataset as based for the training and testing of the model. The image bellow illustrates the kind of images that compose the dataset. Our model will simply take an image as input and output a prediction of the number that was on the image.

The output of the model will be one hot encoded. This means that we will have one output node per class we want to detect. In this case this is 10 classes as they are 10 numbers from 0 to 9. Knowing the input and ouput shape is important for the preparation of the dataset we will provide to the dAIEdge-VLab.
Prepare the envionement
For this application example you will need to have a Python environement wiht tensoflow, sklearn and dAIEdgeVLabAPI installed.
Use the step-by-step user guide to install dAIEdgeVLabAPI. Use the following commandes to install the other depedencies:
pip install tensorflow
pip install scikit-learn
Implement Application
The following section shows a simple but complete application to train a model on the MNIST dataset and validate the model on a remote target.
Define the model architecture
To train a simple model that will recogize the number on an image we can use a simple but effective neural network structure. The model will be composed of :
- The input layer made of
28x28x1nodes - A Conv2D (32 filters,
3x3kernel, ReLU activation) layer - A MaxPooling2D (
2x2pool size) layer - A Conv2D (64 filters,
3x3kernel, ReLU activation) - A axPooling2D (
2x2pool size) layer - A Flatten layer : Converts 2D feature maps into a 1D vector for the dense layer.
- A Dense (128 neurons, ReLU activation) layer
- A Dense (10 neurons, softmax activation) layer : The output layer
Prepare the different datasets
From the MNIST dataset we create 3 sub-datasets :
- A train dataset (used to train the model)
- A validation dataset (used to test the model during training)
- A test dataset (used to test the model on the remote target)
The following code prepares the different datasets:
import numpy as np
import tensorflow as tf
from tensorflow import keras
from sklearn.model_selection import train_test_split
from dAIEdgeVLabAPI import dAIEdgeVLabAPI

# Define test dataset name
DATASET = "dataset_mnist.bin"

# Load MNIST dataset
(x_train, y_train), (x_test, y_test) = keras.datasets.mnist.load_data()

# Normalize pixel values to [0,1]
x_train, x_test = x_train / 255.0, x_test / 255.0

# Expand dimensions for CNN input (from (28,28) to (28,28,1))
x_train = x_train[..., tf.newaxis]
x_test = x_test[..., tf.newaxis].astype(np.float32)

# Split training set into training (90%) and validation (10%) sets
x_train, x_val, y_train, y_val = train_test_split(x_train, y_train, test_size=0.1, random_state=42)


# Print dataset sizes
print(f"Training set: {x_train.shape[0]} samples")
print(f"Validation set: {x_val.shape[0]} samples")
print(f"Test set: {x_test.shape[0]} samples")

# Save the test dataset in binary format
x_test.tofile(DATASET)
Train the model
The following code defines the network architecture and train the model with the training and validation dataset. Finally, we export and save the model in a tflite format :
# Define model filename
MODEL = "mnist_model.tflite"

model = keras.Sequential([
    keras.layers.Conv2D(32, kernel_size=(3,3), activation='relu', input_shape=(28,28,1)),
    keras.layers.MaxPooling2D(pool_size=(2,2)),
    keras.layers.Conv2D(64, kernel_size=(3,3), activation='relu'),
    keras.layers.MaxPooling2D(pool_size=(2,2)),
    keras.layers.Flatten(),
    keras.layers.Dense(128, activation='relu'),
    keras.layers.Dense(10, activation='softmax')  # 10 output classes (digits 0-9)
])

# Compile the model
model.compile(optimizer='adam',
              loss='sparse_categorical_crossentropy',
              metrics=['accuracy'])

# Train the model
model.fit(x_train, y_train, epochs=5, validation_data=(x_val, y_val))

# Convert the model to TensorFlow Lite format
converter = tf.lite.TFLiteConverter.from_keras_model(model)
tflite_model = converter.convert()

# Save the model to a .tflite file
with open(MODEL, 'wb') as f:
    f.write(tflite_model)
Add hardware in the loop
Now we will connect to the dAIEdge-VLab and start a benchmark with the newly trained model and test dataset :
# Define hardware
TARGET = "rpi5"
RUNTIME = "tflite"

# Connect to dAIEdge-VLab
api = dAIEdgeVLabAPI("setup.yaml")

# Upload dataset
api.uploadDataset(DATASET)

# Start benchmark
id = api.startBenchmark(
    target = TARGET,
    runtime = RUNTIME,
    model_path = MODEL,
    dataset = DATASET
    )

print(f"Benchmark started for {TARGET} - {RUNTIME}")

# Wait for the results
result = api.waitBenchmarkResult(id, verbose=True)

# Delete the dataset from the dAIEdge-VLab server
api.deleteDataset(DATASET)
Analyze the results
Once we get the result back from the target, we can analyze the output of the model. This allows us to get the accuracy of the model once run on the device. We can also retrieve the mean inference time :
nb_samples = len(x_test)

# Convert the binary file to an array of float32, then reshape it as (nb_samples, 10)
output_array = np.frombuffer(result["raw_output"], dtype=np.float32)
output_array = output_array.reshape(nb_samples, 10)

# Find the max argument in each nb_samples array of 10 float values
predictions = np.argmax(output_array, axis=1)
# Compute the accuracy of the prediction
accuracy = np.mean(predictions == y_test)

print("Number of inference:", result["report"]["nb_inference"])
print("Mean inference time us:", result["report"]["inference_latency"]["mean"])
print("Accuracy:", accuracy)
Expected output
You can download the full Python script here. Once you run it, you should see something like :
...
Number of inference: 10000
Mean inference time us: 202.7421925
Accuracy: 0.9913